Mark yueh
-
Posts
56 -
Joined
-
Last visited
Everything posted by Mark yueh
-

scratch build Portal Glados by Mark's Fabrication
Mark yueh replied to Mark yueh's topic in ⚒️ Scratch Builds
-
scratch build Portal Glados by Mark's Fabrication
Mark yueh replied to Mark yueh's topic in ⚒️ Scratch Builds


-
scratch build Portal Glados by Mark's Fabrication
Mark yueh replied to Mark yueh's topic in ⚒️ Scratch Builds
10. done


-
scratch build Portal Glados by Mark's Fabrication
Mark yueh replied to Mark yueh's topic in ⚒️ Scratch Builds
9. Installation and testing Before installation, since GLADOS needs to be hung on the ceiling for display, we need to connect all the self-made electronic accessories and most of the wires on the table, Used to reduce time to avoid the hazards of aerial work When all the hanger equipment is done, start to lift GLADOS into the air and prepare to start filming


-
scratch build Portal Glados by Mark's Fabrication
Mark yueh replied to Mark yueh's topic in ⚒️ Scratch Builds
8. CNC computer bracket assembly Since this work GLADOS needs to be displayed on the ceiling, the modification of this section is to make the computer accessories get a good heat dissipation effect even at high places. Aluminum CNC shelves were made for this to hold computer accessories

-
scratch build Portal Glados by Mark's Fabrication
Mark yueh replied to Mark yueh's topic in ⚒️ Scratch Builds
7. Appearance production - 4 aging effects In the game, GLADOS itself has real time changes, so I used many different tools for the appearance of the work, such as brushes, oil paint, Water-based paint is used to complete the aging effects such as peeling, peeling paint, scratches, etc., so that it can be closer to the actual product


-
scratch build Portal Glados by Mark's Fabrication
Mark yueh replied to Mark yueh's topic in ⚒️ Scratch Builds
6. Appearance production-3 Since the work itself needs to be hung from the ceiling to present, and the strength of the 3D printed piece itself is not enough, I added a metal fixing frame to make it more stable

-
scratch build Portal Glados by Mark's Fabrication
Mark yueh replied to Mark yueh's topic in ⚒️ Scratch Builds
5. Appearance production-2 In the combination part between the parts, I chose the method of magnets and heat-embedded screws for assembly This approach can allow the work to have room for error, in case there is a problem, it can be modified at any time


-
scratch build Portal Glados by Mark's Fabrication
Mark yueh replied to Mark yueh's topic in ⚒️ Scratch Builds
4. Appearance production-1 grinding parts

-
scratch build Portal Glados by Mark's Fabrication
Mark yueh replied to Mark yueh's topic in ⚒️ Scratch Builds
4. Appearance production-1 First of all, each 3D printed part needs to be polished, and then various spraying of primer, top coat and effect paint Masking tape will be needed in the middle to achieve the effect I want, with different levels


-
scratch build Portal Glados by Mark's Fabrication
Mark yueh replied to Mark yueh's topic in ⚒️ Scratch Builds
3. Circuit fabrication and testing Because the work needs electric mechanisms and lighting effects, various electronic circuits are made to test that they can work normally. In addition, the HAF700EVO small screen connector modification has also been added to make the works more abundant


-
scratch build Portal Glados by Mark's Fabrication
Mark yueh replied to Mark yueh's topic in ⚒️ Scratch Builds
2. Placement of 3D printed parts After ten days of printing, all 3D prints were finally completed

-
scratch build Portal Glados by Mark's Fabrication 【part 03】
Mark yueh posted a topic in ⚒️ Scratch Builds
Circuit fabrication and testing (part.1)


-
scratch build Portal Glados by Mark's Fabrication 【part 02】
Mark yueh posted a topic in ⚒️ Scratch Builds
Step 02. 3D printed parts placement 1321123390_2.3D.zip -
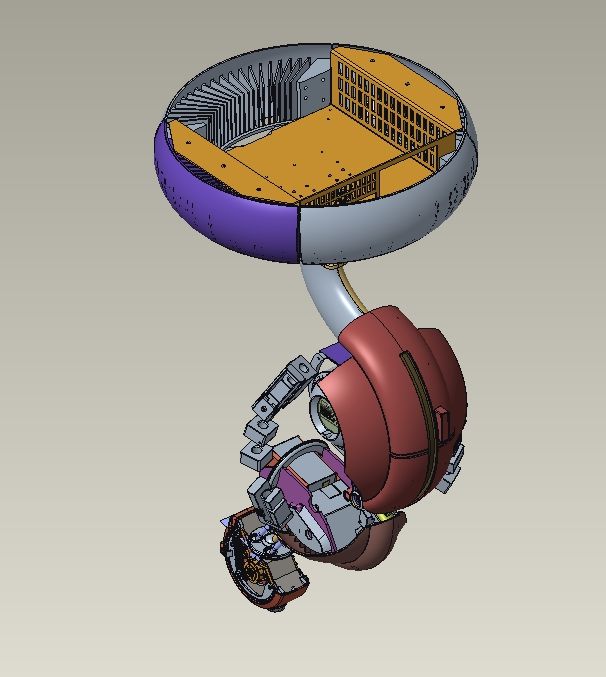
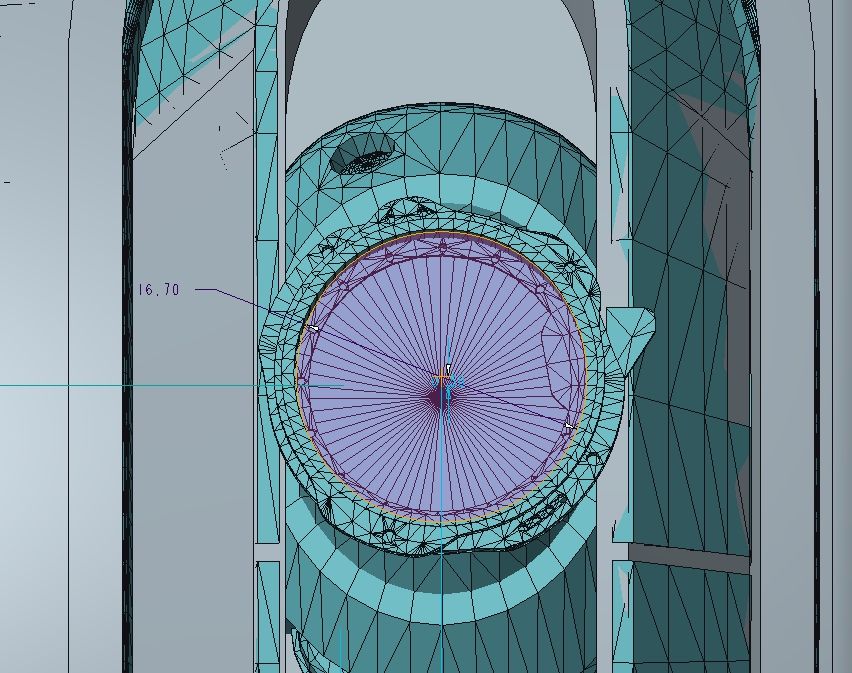
Work ideas and work content This work uses the character GLADOS in the game named: portal as the main axis. The work is divided into two parts, one is the main body and the other is the controller The production part of the work uses a lot of 3D modeling and 3D printing objects, and will also add CNC, laser cutting and hand-made parts What is more special is that the body part has added a more complex mechanical and electronic structure and a camera, so that the head can be rotated, and the camera can also be used as a video. The controller uses the PORTEL GUN in the game as the complaint-like device for controlling GLADOS. In addition to the light effect on the gun body, it also adds a projection effect that can be manually zoomed. However, due to the equipment relationship, many photos cannot be used, most of them are videos, I will try my best to take screenshots to illustrate the production content Work hardware specifications GLADOS MB: ASRock Z690 Phantom Gaming-ITX/TB4 CPU: lntel Core i7-12700 RAM: ZADAK SPARK RGB DDR5 (16GB UNB DDR5 5200 CL38-38-38-84) SSD: ZADAK TVSG3 PCIE GEN3X4 M.2 SSD 500GB PSU: Cooler Master V850 SFX GOLD GPU: NVIDIA GeForce RTX 3080 10GB Founders Edition PORTEL GUN CPU: Intel Core i7-13900K RAN: Corsair VENGANCE RGB DDR5 32GB (2 x 16GB) 5600MHz SSD: Corsair MP600 PRO 1TB GPU: NVIDIA GeForce RTX 4080 Founders Edition MB: ASRock Z790 PG-ITX/TB4 PSU: FSP Hydro PTH X PRO ATX3.0 PCIe5.0 1000W Step1. 3d modeling