Jump to content

Klephts

Members
  • Posts

    2
  • Joined

  • Last visited

Posts posted by Klephts

  1. TBH, I did have more extreme plans for this build, for example

    1. sawing off at least 3 quarter of the case and weld it into something smaller
    2. Maintaining the original front portion of the NR200P and the power buttons
    3. Adding a subwoofer inside
    4. Modding the original 2 x USB in the front panel to connect to the raspberry pi
    5. Modding the back panel to include proper USB and Power ports to power up the entire console

     but due to time and budget constraint, i guess ill have to save that idea for the next CMWS.

  2. Hi, Im Benjamin from Malaysia.


    This is my first time joining Cooler Master Case Mod World Series
    For my first attempt, I'm going to mod the NR200P into an all in one Retropie Gaming Console, which houses the

    1. Rasberry Pi 3B+ running on Retropie
    2. A recycled bluetooth speaker which I'm not using anymore
    3. A 7inch portable lcd display
    4. and i will attempt to wire the retropie to the NR200P's Power Button and the white LED in the start up and shut down sequence 


    NR200P

    1) The NR200P


    Stripped NR200P

    Untitled1231.thumb.png.c32a999e9d7c5efcff9f47902a4cd15e.png

    2) Stripped NR200P for assembly and taking measurements for custom acrylic side panels


    GPIO

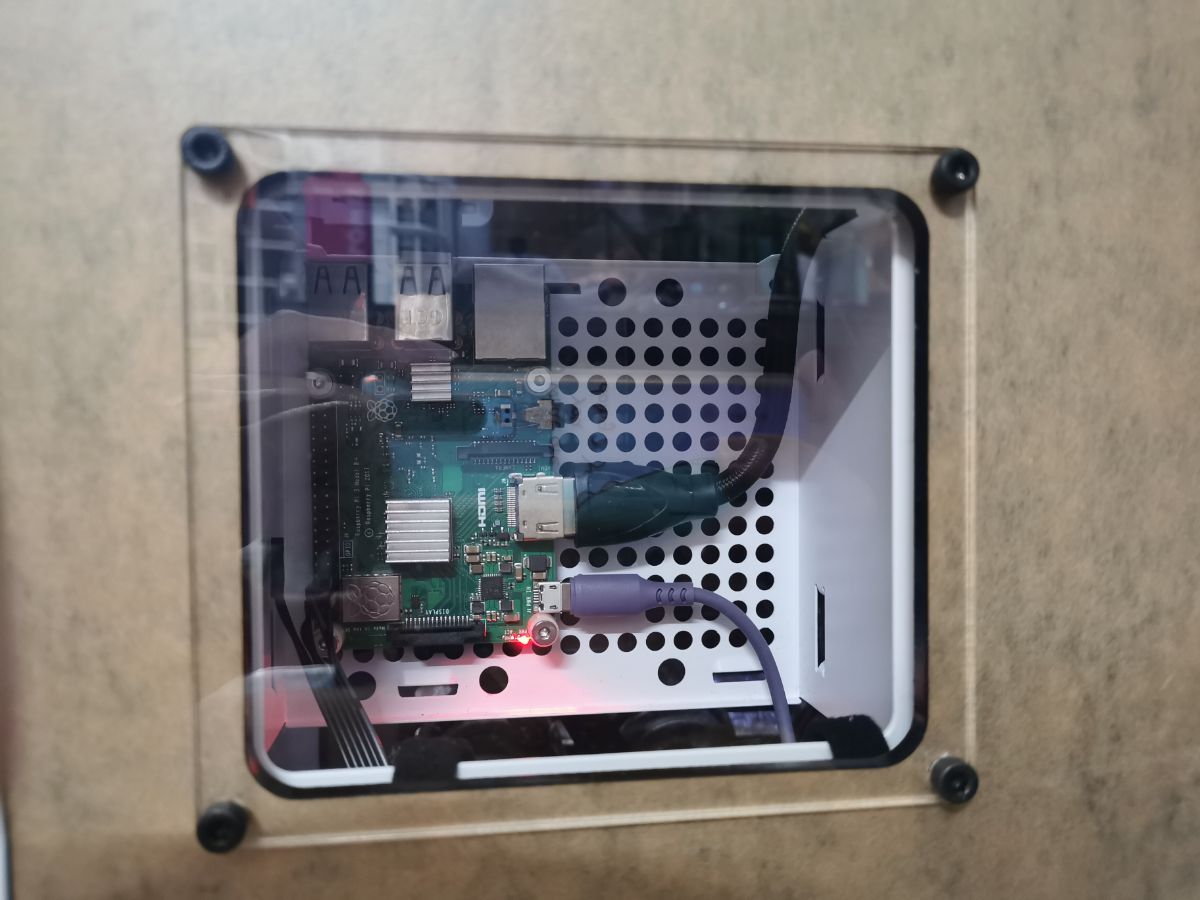
    3) Connecting the power and led pins to the Raspberry Pi and did some configuration on the pi to recognise those pins as power buttons and indicators


    IMG_20221219_212644.thumb.jpg.b2d37d7b6119f3b8ec21dba743a7d055.jpg

    4) Preparing M3 * 20 Screws, Nuts, Washers and Stand offs for the Raspberry Pi


    IMG_20221219_213634.thumb.jpg.853fb3bbf7935df23a375f0daba8b38a.jpg

    5) Ready to mount!


    IMG_20221219_213819.thumb.jpg.6712998ff7acabe069e26eefb3bd538b.jpg

    IMG_20221219_213810.thumb.jpg.a560dfd666e55c4e240a6ef03696b280.jpg

    6) Raspberry Pi Mounted on to the SFX PSU section of the NR200P with the right height on the standoffs to prevent short circuiting 


    7) Preparing Acrylic Panels


    photo_2022-12-20_00-17-51.thumb.jpg.c9a2d16e5e1615b7f0561ad35757df26.jpgphoto_2022-12-20_00-17-59.thumb.jpg.2b522ce14f8b2527cfde261a6daab302.jpgphoto_2022-12-20_00-17-56.thumb.jpg.5c5ef04437c83d8c2c5dc127e6fd5bae.jpg

    8 ) More Acrylic Panel preparation


    IMG_20221219_214137.thumb.jpg.9d6a38f8704f17f4ae14fa042a3ad212.jpg

    9) Size Checking


    IMG_20221219_214729.thumb.jpg.3b87cd99aaad1a75efe4fe64c123de47.jpgIMG_20221219_214745.thumb.jpg.d3721ac16be4d3d926ecced5add82097.jpg

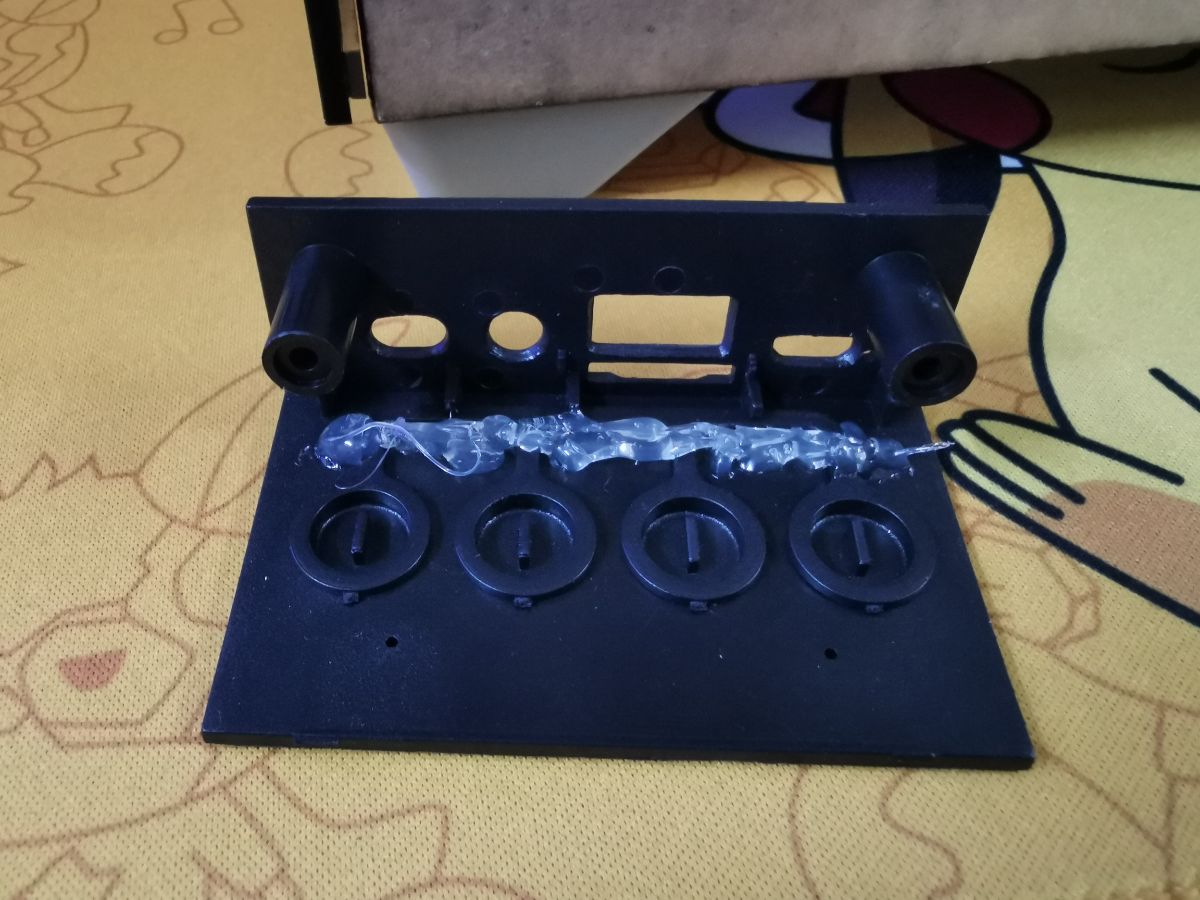
    10) Recycled audio Panel


    IMG_20221219_215113.thumb.jpg.45b8377a70dc5d9dc009afef99728230.jpgIMG_20221219_215122.thumb.jpg.c733c1453c2842c913ae55b1cf2a39e7.jpgIMG_20221219_222715.thumb.jpg.2e4fd22ec2a07042c819bc12e96f4559.jpg

    11) Hotglue and some Acrylic Stand for the 7inch LCD Display and DIY speakers


    IMG_20221219_223104.thumb.jpg.a436a025c51078bc521e4eb8df6d38da.jpg

    12) New acrylic side panel, attached the the NR200P frames with 8 Magnets 


    IMG_20221219_224100.thumb.jpg.84cb060fdcac4deadeca876a982fbb9e.jpg

    13) Preparing the back panel for custom grommet


    IMG_20221219_224052.thumb.jpg.28e300a58e134337113446c1a91f5367.jpg

    14) MP5110-L as material for grommet


    IMG_20221220_004213.thumb.jpg.7873c5f38225cdd193dad39eac8bbd6d.jpg

    15) Back Panel with completed grommet


    IMG_20221219_235847.thumb.jpg.f6ab924873bd49294a4bca9505877fa4.jpgIMG_20221219_235841.thumb.jpg.31b37f1b27080a669591398200aa83cc.jpg

    16) The Other side


    IMG_20221219_231157.thumb.jpg.f6c9206f061c67fffac630873313f5f7.jpgIMG_20221219_234733.thumb.jpg.2c6f67eec98b02e51d28c05ab004b48a.jpg

    17) Testing the power button to see if it fires up (Discovered that the audio is not working, recycled bluetooth seems to be broken somehow)


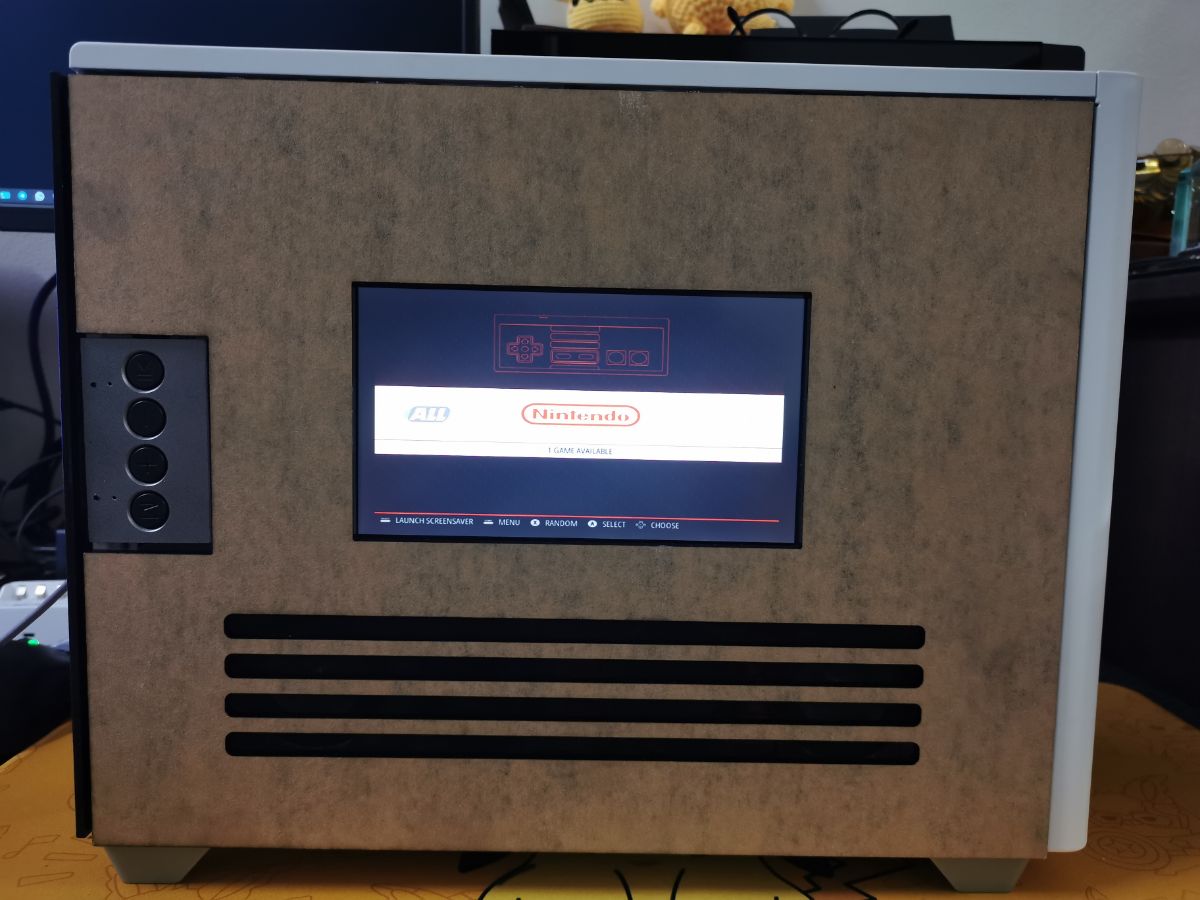
    18) Testing for gameplay


    FINISHED PRODUCT


    Quote

    BEFORE PEELING OFF THE RUGGED BROWN PAPER (TBH i kinda like how it looks with the brown paper one - gives it a raw retro rugged feel...)

    IMG_20221219_235742.thumb.jpg.21cc7cab449b74e5e0b8d1fe01f16e0a.jpgIMG_20221219_235753.thumb.jpg.0e1635bd05c6392ee3d866d7e237e7c8.jpgIMG_20221219_235802.thumb.jpg.90a5944cdcbb9295487e159d0c3ef76e.jpgIMG_20221219_235817.thumb.jpg.e65a80c2fe60f180055454b15f9f1211.jpgIMG_20221219_235838.thumb.jpg.793613bf09193622fbb3d7c1aa4ae4b0.jpg


    Quote

    AFTER PEELING OFF THE BROWN PAPER (Looks cleaner - but not as rugged)

    IMG_20221220_000028.thumb.jpg.51cf7c0dbafa9ea7ccea7ff636c53ba9.jpgIMG_20221220_000046.thumb.jpg.3e7dcf72328d7f98ac9ee9398be6e019.jpgIMG_20221220_000223.thumb.jpg.0b1842eb68a8139136a74a2e4af50aa8.jpgIMG_20221220_000232.thumb.jpg.5048a030d62eac204ba0754e27f85edf.jpgIMG_20221220_000547.thumb.jpg.4ada9d00ad54dfb7d22066bdd1a3e1d0.jpgIMG_20221220_000554.thumb.jpg.a7f5278b9ce8d0e574468502b2c8ce29.jpgIMG_20221220_004211.thumb.jpg.60e43ac4509292e60fbb1697b0b8ef00.jpgIMG_20221220_004213.thumb.jpg.bf0e94c12a94db5d3dfc6fdc2f51b153.jpg


    Quote


    That's it for this year, I do intend to further work and improve this build if there is another CMWS next year. 


    Total time taken to build this unit was about 2 months, started a little late because it took me awhile to get the parts due to budget constraints.


    The images below keeps loading itself into the post.. i tried removing them a few times but it keeps coming back *shrugs*🤷‍♂️

    IMG_20221219_214737.jpg

    IMG_20221219_215048.jpg

    IMG_20221219_215053.jpg

×
×
  • Create New...

Important Information

By using this site, you agree to our We have placed cookies on your device to help make this website better. You can adjust your cookie settings, otherwise we'll assume you're okay to continue..