

RexY
-
Posts
7 -
Joined
Posts posted by RexY
-
-
Hi Everyone.
Here is the photo of the finished project.


-
Hi Everyone.
I painted the cooler master logo white.

Then I added some paper to cover the hole.


Wirings are done, and I did some test fit of all the components.


The project is 98% done. And I will upload the final photos tomorrow. Thank you guys.
-
Hi Everyone.
It's been a while since my last update.
Here are some progress update on the build.
I cut the side cover and sand it to fit nicely, I use the core of a kitchen towel/tissue and wrap it with a sand paper.


I also paint the 3D printed parts gray.

I added some magnet on the side cover. I drill a shallow hole and use a CA glue for the magnet.


Then I use a cylinder magnet on the frame and stick it on the frame using CA glue. I also did cut some holes for the Cooler Master Logo.


I also asked some guidance from my husband for the soldering/wiring as this is my first time using a soldering iron.

That's it for now. Hope you guys enjoy the build.
-
Hi Everyone.
Small update for the project.
I used some flexible straw for the design and attached it using CA Glue.


-
Hi everyone. Finally, some of the 3D printed parts are done.
I also did some cleaning on the 3D printed parts and did some mock-up testing on it.


-
 1
1
-
-
Hi Everyone,
I am Rexy from the Philippines. It is my first-time to join here in CMWS.
I will do Modification on the Cooler Master MM731 with a theme of Sci-fi.I like to watch Sci-fi movies which gives me a futuristic concept of what I called - "MOU-CA" (MOUse in a CApsule).
The idea is to put a revolving mouse inside an experimental capsule.
The base structure is 3d printed. And for the aesthetics, I'll be using scraps, recyclable materials and some 3d printed parts.Thank you Cooler Master for this opportunity.
And, I am looking forward to see all the entries for this season.Peripherals:
COOLER MASTER MM731

Inspiration:

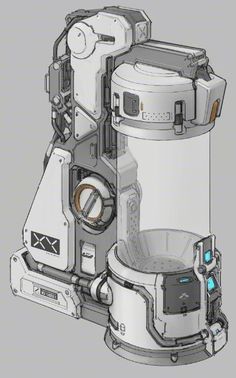

*I don't know who the original creator of the photos from above. I saw it on google with different uploader so - who ever the original creator - credits to you.


RexY - MOU-CA (Finished)
in 🖱️ None PC Mod
Posted
Some night shot.