

Timpelay
-
Posts
170 -
Joined
-
Last visited
-
Days Won
8
Posts posted by Timpelay
-
-
Cooling cluster incoming!
First time using EK Waterblocks new radiators and damn they are next level from the old ones. Especially these 44 mm thick with multiple ports and drain. They also come in white right out of the shop which is great. Thanks alot EK for supporting!
So, the cluster.
As previously shown in my 3D-model I'll use triple 44 mm thick 240 mm rads in series.
I decided to build it this way to use the case width in the best way possible still keeping air intake at the front of the case an exhaust throughout the sides(!) and top.


No less than 8 Cooler Master MasterFan MF120 Halo White Edition will be used.
Six mounted to the radiators and two in the front seriving as intake fans.

The new EK Micro fittings is awesome in tight spots like this and uses a hex socket which makes assembly alot easier and saves my fingers.

-
Case floor will be cut from 3 mm black acrylic.
The CM-logo cutout is the air-intake for the hidden SFX PSU.
I will utilize the spacing underneath this floor for cable management, I/O connections and the actual PSU

-
Motherboard I/O frame and single slot PCI-e to be laser cut from 8 mm black acrylic.
I'll build with a RTX 3080Ti FE graphics card and with EK waterblock on it it's only single slot for the bracket.
This frame will be attached to the internal bottom of the case together with the SFX PSU.

-
So I spent the weekend getting all panels back together.
Decided to use my trusted Loctite Precision. Super strong and fast. Only downside compared to Epoxy is that it does not fill any gaps.

The cuts made with the sliding mitre saw is so good at some parts that you pretty much can't see the connection when glued back solid.


Tried to nail this as good as possible and think I got it done alright?

Some parts of the front is 98% structural and 2% visible which makes them easier to get back together.

Original diffuser guides for LED will be modified and put back in.
Allthough I'll mount new strips instead of modifying the original hard PCB LED strips used in the case.

Top guides, bottom guides, front guides. They all get modded and put back.

Same here at the front, cuts and joints are not placed together for different parts giving back some natural stifness to the panels.

This part took some extra time because I figured out that my 170 mm would make it possible to perfect match the pattern.

A panel that won't be visible fron the outside unless you open the front of the case but damn it feels good to have it back together alot shorter but factory looking!

Next up is more internal work as all water cooling parts from EK has arrived.
Still need to sort out mobo/CPU though to align my CPU water block for the tubing design.
But I will be able to build my cooling cluster and see how it looks in reality!
-
Front pieces ready to be laser cut.

Woofer assembly with the 5 mm mounting bracket and 3D-printed transfer ring in beautiful purple.


Front piece in 8 mm with neoprene rubber stripes filling the gap against the frame.

Woofer fits with a couple of millimeters between those front parts of the frame.
The assembly is mounted as a clamp with guidance holes in the 5 mm bracket securing it to the steel frame.

The front is mounted from the inside securing the woofer bracket and frame into a solid assembly.

First part done and now off for some interior panels.

-
I cut all panels by hand leaving 5-10mm on each side to be sanded down to exact length.
After spending some time sanding on my old stationary grinder I figured this will not be done in hours and the result not what I wanted.
Lets try something else!

I got this Bosch sliding mitre saw I'm using for all my construction work at home.
It got a fine tooth blade on it so why not try..

This actually worked perfect! Clean 90 degree cuts without any twisting and turning.
Just had to go really slow and don't feed too fast.

Some parts was a bit hard as they're bent and got edges that prevent them from laying flat and straight.
I used wood spacers that I could cut through and still get 90 degrees from the finished cut.
Not every day you can work outside this late a year and still enjoy the sun.

Spent an hour or two cutting and fitting. Cutting and refitting untill I got each panel into perfect length.
Top panel ready!


Top, bottom and outher part of the front in place.
Modding the pieces in a certain order will make sure they fit perfect to the frame and each other when ready.

As mentioned before I'm trying to place my cuts in the best way possible to not mess up the design elements of the case.
Top grille here with the comb pattern. Will not be visible when finished but feels good to have it done 100% anyway


Front is coming back to life!


Getting the cuts separated from each other will give the finished pieces better natural strength when put back together.

This is looking frickin awesome IMO!
So happy with the propotions seeing the case come back to life as a real mini Cosmos!

-
Got the frame buffed and now with some fresh white paint on it.
Ready to get my hands full with those panels!

-
More parts modeled and ready for printing!
First up is the cable terminal.

The bass reflex port will be a two-part assembly with the large internal pipe and the backside port.


-
When not cutting I'm doing some 3D-modeling getting my cooling system figured out.
So 3x 240x44 mm radiators will be squeezed inside using a bit different layout. Hopefully giving me enough rad surface to keep it super cool at very low rad-fan rpm.
2x 120mm open air intake fans serving the cooling cluster. Then 2x 120mm fans on each rad.
I'm doing this cluster trying to utilize the case width and with the ambition to upgrade from 2x 240 slim rads in SL600Mi to 3x 240x44 rads in this!

-
The "Bass Ring". Connection ring between inner case and subwoofer element.
Will also work as fastening plate for the woofer.
The only 3D-printed part in the front of the speaker.

Printed and equipped with these wonderful Ruthex brass M4 threaded inserts.

-
Lets go!
This project will require alot of 3D-modeling. I'm planning to model pretty much the entire speaker assembly and parts of the case I'm keeping.

I'll start with the speaker element assebly.
It will be a sandwish type built by many layers, each one doing something visual or structural.
My idea is to not have any visual screws at all exept on the back side. This will require proper planning and step - by - step assembly.
Acrylic panels will be laser cut and other parts 3D-printed.

-
Lets start cutting!
I will start by cutting all parts manually removing about 160 mm.
Then I'll trim in all parts perfectly later.
Not so large anymore!

Measuring twice, cutting twice.
I'm dialing in my cuts to remove a section that won't ruin the original desig.
Here, for the front piece the middle section will go.

Each panel is built with many parts. The front is like 5-6 parts alone with structure, panel, shell, LED translucent parts and LED strips..

Feels a bit awkward going back to the roots doing this kind of work to a case.
Missed it.

Rough edges and no straight cuts doesn't matter as I'll be sanding the last 5 mm or so down to perfect fit.

-
Mmh some different hardware goodies compared to all computer parts that go through my workshop.
It took me many hours founding the speakers I wanted, and I'm really happy unboxing these beauties.
The Flax cone of the woofer is really something.


-
Woah, two wild NR200P appeared!

Pretty cool to have them stacked actually. But stereo won't work that way


More something like this.
Fronts up the chassis is pretty much perfect in size for a bookshelf speaker/studio monitor.

-
Got some work done this weekend welding the frame back together!
Will be cleaned and painted later when I know everything is lines up.

Cleaned and back in the workshop for some measuring.

I bought this underlay/cutting board which is perfect for this type of work.
Super easy to see if things are straight.
Well 355 mm on point.


I got some serious work to do with all exterior panels.
Been taking it all apart and I have alot of cutting to be done
Perf. picture for size comparison!

-
Case stripped and the bare frame ready for some measurements.

It will certainly be a challenge to modify these ones.
I don't have the tools or knowledge how to weld aluminium and will have to get some professional help when it's time to shorten them.

As I'm removing 170 mm in both directions, I'll manage to align the mounting holes of the frame back together in the corners for the brackets going between both sides.
I'm eager to use as much parts as possible of the original structure.
When I did my SL600Mi I cut the frame in the middle keeping all corners intact. Then welded it back together joining them in the middle.
This time I'll keep just two corners and weld two. By doing this I'll keep the continous beams with their holes at a perfect spacing.
In the corners, there are 90 degree angle brackets attached with two screws. So technically it's possible to assemble the cut frame back together with those using counter sunk holes as the original.
But I will weld the corners instead for stability and to better control how to get it back straight.
As two corners still are mounted with screws I'll be able to disassemble it if needed.

No Dremel here guys. This requires some proper modding tools.
Go hard and go loud!
Allthough this new brushless angle grinder is pretty much quiet comparing to my corded one.

Aaah, the smell!
I'm doing this with the parts still assembled to prevent it as much as possible from twisting and moving.
Lets get those edges clean and ready for welding.

-

This is one huge case!
The white C700M that I got is a prototype case previously used by CM for event purposes.
A bit rought around the edges as it has been built a couple of times and travelled alot.
No problem as I will cut almost every part of it into pieces
-
One of the benefits with using Focal speakers is that they supply technical sheets for all their products.
Helps alot to have those mechanical drawings to model my replicas after instead of measuring myself.


I will model the entire speaker and the parts I'm using from the NR200P case to get it all together as a 3D model.
Then I'll fabricate all the pieces and assemble them. At first only by mechanical solutions but when I got it all figured out final assembly will probably include glue/sealant.
-
Been doing some 3D modeling, starting with the iconic inner frame of the Cosmos.
Many of you are more than familiar with this since the new gen Cosmos has been around for some years now and been used for modding all over the world.
I will shorten the frame by 170 mm ending up with 355 mm in both directions.
From this I will work my way out, starting with creating the layout and ending with how to modify the exterior panels


-
Ever since I built my SF600Mi for CMWS19 I've been eager to do it again, to an other case and improve every possible part of the process.
Ambition:
To create the mITX version of C700M that Cooler Master haven't produced, yet. Hopefully, this project will encourage them to do so.
This project will explore an internal layout not seen very often, both regarding hardware and cooling components. Made as a tribute to the modular layout in the C700M.
Design:
I will reduce the case with exactly 170 mm in both height and length (keeping width). Modding every single piece of the case possible to get it back together looking just the same on the outside, yet smaller.
The inside will be completely rebuilt with a layout taking advantage of the case design regarding cable paths, cooling and visuals.
A mITX motherboard will be placed vertical mounted to the backside of the case with I/O facing downwards using the raised bottom to route all cables to the setup.
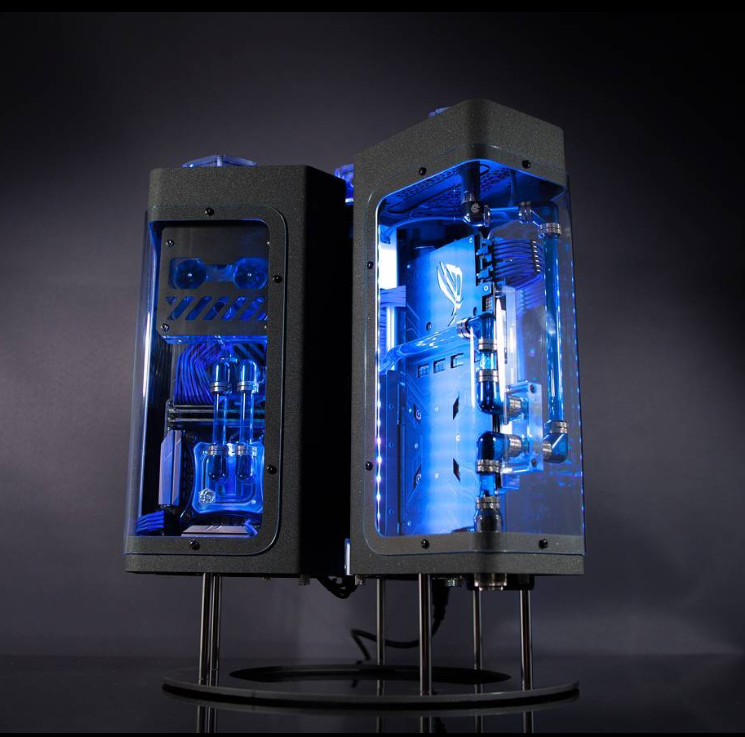
I will build a cooling cluster at the front/top of the case using x3 240/44 mm radiators to provide superb cooling.
-
I will build the case Cooler Master still not have built.
Idea:
Transform a Cosmos C700M to a mITX SFF build.
Hardware:
- Case - Cooler Master C700M
- Mobo - AORUS Z690I ULTRA
- CPU - Intel Core i9 12900KS
- RAM - 32GB Corsair Dominator RGB DDR5
- SSD - Samsung M.2 Nvme 1TB
- PSU - Cooler Master V850 SFX Gold White
- GPU - Nvidia RTX3080Ti Founders Edition
- Fans - 8x Cooler Master MasterFan MF120 HALO
Water cooling
- EK Quantum Magnitude Full nickel CPU-block
- EK Quantum Vector FE RTX 3080 D-RGB - Black Special Edition VGA block
- EK Quantum Kinetic FLT 80 D5 PWM D-RGB - Plexi
- 3x EK Quantum Surface P240M - White Radiators
- EK Quantum Torque Fittings
- 12 mm Nickel - Brass hardtube
- Custom distroplate
Sponsors:
EK Waterblocks
AORUS
Cooler Master


-
I will be working towards these three pilars doing my best to compromise in the best possible way.
- Aesthetics
- Sound quality
- Versatility
Since I'll be building powerful speakers using a thin steel case to start with, it will be difficult to deal with vibrations and dynamic pressure.
Design:
The case will be standing on its backside, with the top used as speaker front.
I've decided to use dual tempered glass side panels to create complete see-through speakers, this is no ordinary MDF speaker.
I will design my own bass reflex port for the back of the speaker with the possibility to fine tune it.
Overall the NR200P design will be kept as much as possible which makes it more challenging but also more fun.
Speaker feet is still under consideration. One idea is to use the original case feet for a complete NR200P design, but since they are made of plastice I have second thoughts...
-
It's about time we put two NR200P in stereo.
Idea:
Build bookshelf sized stereo speakers using Masterbox NR200P cases.
Hardware:
- Case - NR200P
- Tweeter - Focal Flax Evo TAM tweeter (Aluminium/Magnesium ‘M’-profile inverted dome tweeter)
- Woofer - Focal Flax Evo PS 165 FXE 6½" (165 mm)
- Filter - Focal Adjustable Crossover 12-18dB/oct @3kHz
- Cables - Oehlbach Twinmix One 3 mm²
- Terminals - Dayton Audio BPA3-8 Gold
Sponsors:
AAMP Nordic (Supporting with Focal)
Cooler Master (NR200P was sponsored in an earlier stage for previous projects and now disassebled and reused for this project)


-
Absolutely stunning!
And yes, I love the design hehe..
-
 1
1
-


Timpelay - C700Mi
in 🖥️ Tower Mods
Posted
EK Magnitude full nickel CPU-block. Looks so good!
Can't decide whether to go for it as it is combined with the gold fittings, or change the top to gold aswell.
Will have to try both and see what looks best.
Together with 3080 Founders Edition water block. Absolutely love the small size and its variable ports at the end.
Keeping the protective plastic on as long as possible when testing in the case.
Probably about time to mount it on the graphics card.